How to Build a Workhorse Grain Mill
Part 1
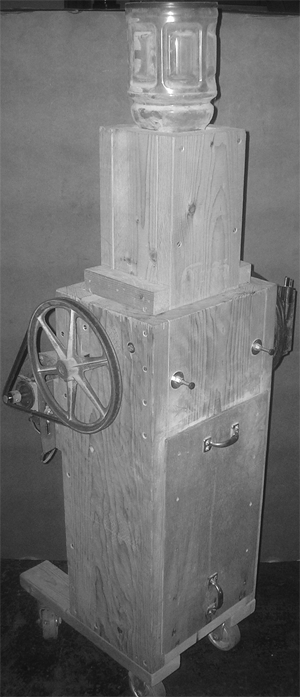
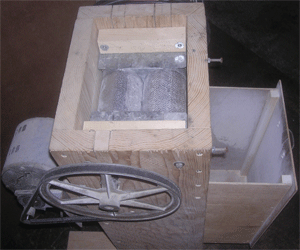
| Before we get started, I'd like to take this opportunity to quash any and all ugly rumors to the effect that the Thrifty Gadgeteer was kidnapped and forced to operate a new brewery in Buffalo, NY. NOT SO!!! Let's review the facts: 1) Yes, Thrifty (a.k.a. Phil Internicola) is indeed a partner in the Flying Bison Brewing Company, and 2) No, Thrifty did not retire, but was merely on hiatus while engaged in the all-consuming process of starting a brewery from scratch, and will now resume producing this beloved column until even the insane minority is thoroughly sick of him, and 3) No, the brewery will no longer impact either the quality or the quantity of my ramblings. In fact, you can expect the brewery to provide plenty of gadget grist as we take on the challenges of bringing great beer to the masses at a cost even Thrifty would call reasonable. (I think this is called a "plug", but now I have to worry about whether I'll get paid or billed for this article!) We'll be celebrating Thrifty's return with our most ambitious project yet - a very sturdy and reliable double roller grain mill that can deliver a perfect crush at about 5 lbs per minute (that's Warp 5 speed for you homebrewers!) This should create a tiny bit of interest for those of you who have burned-out several power drills, your elbows, or both, cranking one of those expensive but rather cheaply made commercial grain-mutilators. By the way, this unit has stood the test of time and extensive use at the hands of yours truly and my partner as we produced the equivalent of several hundred homebrew batches while proving out our recipes before our brewery equipment was delivered. What's even more amazing is the cost — with a little luck and ingenuity the entire project could be built from "recycled" materials. Even if you have to buy a few hardware items, you should be able to keep total out-of-pocket expenses well under $50. I believe I can say with some confidence that you will not find a mill anywhere near this good in any shop, catalog, website or other commercial source for less than $250. Are we starting to get the drift of where I'm going with this? Good, I thought I saw some of you nodding off for a second there. The mill design is fairly simple. Two steel rollers are supported on iron pipe axles and bearings in a cabinet made out of construction lumber. One roller is driven by an electric appliance motor via V-belt and a large pulley wheel for speed reduction. The second roller is driven by the first roller through a set of home made gears. The rollers are easily removed for cleaning and maintenance. The crush gap between the rollers is adjustable. Uncrushed grain enters the crush gap through a removable hopper, and crushed grain drops into a removable catch bin. The entire assembly is mounted on casters for easy moving and storage. As usual, the price you pay for economy is your time, which you will invest lavishly, first in gathering the needed materials, and second in fabricating and assembling the parts. While this project is not as complicated as the Recirculating Infusion Mash System we built in previous articles, it does require access to, and experience with, some tools the average Joe might not have — a radial arm saw and a bench grinder — so, before you start, make sure you have either the tools or a friend who has them and likes beer. Also, this is a multi-part project that will take several issues to cover. This issue is a teaser — just the general description and the materials list, which should keep you plenty busy until next time when we will deal with the heart and soul of the mill — the rollers. Below is the complete materials list for the entire project. You don't have to acquire all of these materials up front if you feel confident that you will be able to get all of them without much difficulty. For the time being, you can get by with just the starred (*) items to build the rollers. Don't be intimidated by the materials list. Most of this stuff is common hardware the seasoned veteran will have laying around his garage or basement already, due to years of accumulation from leftovers and scrounging, and steadfast resistance to spousal edicts to get rid of all that valuable junk. If you don't know what I'm talking about, then you are probably a novice at the make-it-yourself game and are advised to sit this one out. Unless you feel lucky — Well? Do ya feel lucky? Do ya? If so, go forth and seek out the following items:
Construction lumber as follows (lengths are minimum continuous lengths needed) (visit the dumpster at a construction site). Note that actual construction lumber width and thickness will be 3/8" to 1/2" smaller than the nominal sizes given.
The following hardware items can be got at the flea market or hardware store, unless you already have them in your scrounge
You will also need one final item, an Automotive V-Belt, which you should not get until after the rest of the mill has been built because the size of the belt will depend on the size and relative positions of the pulley wheels on the motor and drive roller axle. Sorry, but we can't start building the mill this time around because the Powers That Be are rationing column inches again. I'd recommend a mail-in protest campaign, but I don't want to have "instigator" added to the long list of titles I've been given. Of course, I can't be blamed if you should independently decide to express your displeasure at this ill-advised policy, can I? Your reaction to injustice and oppression is precipitated by your personal outrage, and is uninfluenced by any outside opinion, right? How you choose to vent your pent-up rage is completely beyond my control, isn't it? OK, I have to go hide now. Bye. |


Continue to Part 2
Return to Index
Copyright 2008, Great Lakes Brewing News
